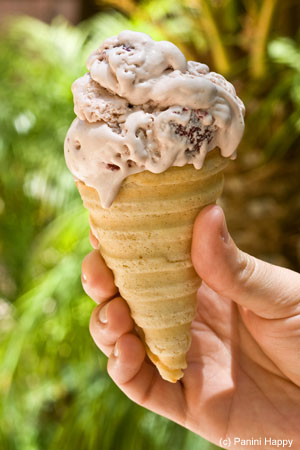
This one is worth screaming from the rooftops. YOU CAN MAKE ICE CREAM CONES WITH YOUR PANINI MAKER! Easily! With no special ingredients! And they’re good!
Get ready for your inner child to leap with joy once that familiar sweet, cookie smell you love from the ice cream parlor wafts about your kitchen. If you’ve ever watched the ice cream folks make cones, all they do is place some batter on a shallow waffle iron, press out the batter and shape the cone. It finally occurred to me…couldn’t we do the same thing on a panini press? The answer is: absolutely.

For the cone batter, I looked to this super-helpful post on the Cupcake Project blog. Stef offered tips for pressing and rolling ice cream cones on a traditional waffle cone maker as well as a link to pastry chef Gale Gand‘s cone batter recipe on the Food Network website. You probably already have most of the ingredients on hand: heavy cream, vanilla, powdered sugar, flour, cinnamon, nutmeg and cornstarch. That’s it.

I made up a batch of the cone batter, applied a dollop to the panini grill (a heaping tablespoonful seemed about right), closed the lid, and waited anxiously for a little over a minute.

This amoeba-with-ridges may not resemble the perfectly round discs that a regular waffle cone maker produces, but keep the faith…it’ll be worth it.

It was easy enough to make my own cone mold. All I did was draw a big circle on the back of an old file folder (in truth, I traced the outside of a roll of blue painter’s tape), cut it out and taped it into a cone shape. For those of you without a roll of blue painter’s tape, I’ve made a little template for you.
At this point, the cone is very hot off the press. Be tough! You’ve got to work quickly to shape your cone before it cools (like less than 10 seconds). Position your mold in the center of the cone, leaving a little space at the edge…

…to allow the cone to fold over on itself at the bottom without leaving a hole. You know that ugh feeling when the drip-drops of ice cream on your sneakers let you know there’s a hole in your cone.

The cone miraculously sticks itself together and, after about 10 seconds or so, holds itself in place for good.

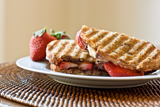
Hooray – ice cream cones!
By the way, they are actually really good ice cream cones. You get big vanilla flavor along with hints of spice from the cinnamon and nutmeg. They’re crisp just like they should be. It turns out that the amoeba shape that the panini grill produces, once rolled, actually makes a more even-edged ice cream cone than the traditional waffle cone maker. Ha! So maybe this way is even better. 🙂
I hope you’ll all be grilling off tons of ice cream cones this weekend – and while you’re at it, go ahead and fill them with some incredible Homemade Strawberry Ice Cream!
[print_this]
Make Your Own Ice Cream Cones on a Panini Press
Adapted from Gale Gand’s Waffle Cone recipe on the Food Network website
Prep time: 40 min (including rest time) | Cook time: 30 min | Total time: 1 hr 10 min
Yield: 14 ice cream cones
INGREDIENTS:
- 1 cup heavy cream
- 1 1/2 teaspoons vanilla extract
- 1 1/2 cups powdered sugar
- 1 1/2 cups all-purpose flour
- 1/4 teaspoon ground cinnamon
- Pinch ground nutmeg
- 1 tablespoon cornstarch
DIRECTIONS:
- In a medium bowl with a whisk or electric mixer, whip the cream and vanilla together until it is mousse-like. Sift the remaining dry ingredients together in another bowl. Add the dry ingredients to the cream and stir to make a batter. Let the batter sit for 30 minutes.
- Preheat the panini grill to medium high heat (about 375°F).
For each ice cream cone:
- Place a heaping tablespoonful of batter onto the grill and close the lid, completely pressing the batter. Grill for about 90 seconds or until the pressed cone is browned but still malleable; it will be an oblong shape. Carefully transfer the pressed cone to a cutting board or piece of waxed paper.
- Position your cone mold (download a template and instructions for making a mold here) in the center of the pressed cone, leaving about 1/2″ of space between the long edge of the pressed cone and the pointed end of the cone mold.
- Working quickly and carefully (the cone will be very hot!), roll the pressed cone around the cone mold to shape it.
- Leave the cone on the mold for about 10 seconds to set the shape.
NOTE: After some testing on different grills, it seems that this recipe works a little better on grills like the Breville Panini Press where the grates close a bit more tightly together. The Cuisinart Griddler doesn’t close quite as tightly, so it gives somewhat thicker cones.
[/print_this]
 Panini Happy, online since 2008, is more than just a sandwich blog. Here, you'll find hundreds of my original
Ingenious! I’ve been dragging my heels about buying a panini maker, but this could definitely tip the scales for me.
It’s my personal goal to get you off of the panini maker fence, Lydia! Lol, if I have to bring you one to the log cabin myself. 🙂
I have alwasy wanted to make homemade ice cream cones- but I suppose it always seemed intimidating! This looks so easy and my kids will LOVE it! Thanks Kathy!
This is such a fun idea. I can’t wait to try it! My waffle maker has deep holes, so I think my panini press will work better for making cones. And, these sound like delicious cones.
Yes, it’s the shallow ridges on the panini maker that really make it possible. Always fun to find more and more uses for this machine!
WOW! This is a genius idea! I applaud your creativity! 🙂
I am impressed!! I found your link on TasteSpotting and was intrigued with the photo. This is something I need to try…I don’t have a panini grill but since finding this site, I’m just going to have to spring for one!!
This is so creative. I love the idea of making my own ice cream cones. I’m going to to make a gluten-free version. Thanks so much for sharing this great idea!
I sit down to my Friday am tweets and everyone’s a twitter over these. NICE! Happy weekend to you, Kathy 🙂
Same to you, Kelly – gorgeous forecast for today. 🙂
Ummm… Seriously!! Can’t wait to try this! What a great idea to do for a summer party (or I guess anytime!) 🙂
What a terrific idea! Today is the first day of summer vacation for my kids and this will for sure be going on our “recipes to try” list. It will no doubt be tops on the list. So glad I finally broke down and bought my panini press earlier this year…can’t wait to try this and our homemade strawberry cheesecake ice cream. Thanks!!
I can attest that the cones go fabulously with strawberry ice cream, Brenda! 🙂 Hope your kids love it!
Too cool! I’m finally picking up an ice cream maker on the way home from work… which obviously means I’ll be needing to make cones too!
Obviously! Sounds like there is a tasty weekend in store for you. 🙂
This is such a fabulous idea, I never would have thought to make ice cream cones at home! I bet it smells wonderful like Ben & Jerry’s:-)
Glad I’m not the only one who loves that smell. 🙂
Genius idea! And this is coming from someone who owns a waffle cone maker. 🙂 Homemade ice cream cones are incredible.
At first I thought it said “make you’re own ice cream” on the press (I missed the “cone” part) and I was like “WHAT WHAT WHAT?” Lol. I’m totally totally making these. Awesome.
Lol, Amy. Making the actual ice cream on the press would require many orders of magnitude more patience and technique than I possess. 🙂
You are brilliant! This sounds so do-able. I dont think I’ll ever stop getting stumped by the creativity the food blogging world keeps throwing at me! Thanks for sharing!
These are genius!!! So, is the texture very crisp like a cone? Or a little more soft like a waffle? Either way, I’m mesmerized by these and can’t wait to try making them. 😉
They’re crisp, but not as durable as a store-bought sugar cone. Not soft like a waffle, except for those few seconds as you’re rolling them around the mold. You should definitely try them, Carolyn!
Hm, I use a George Foreman grill instead of a panini maker, I wonder if it’ll work? I’ll have to try!
It would be worth a try!
I just love this…I can hardly tell you how much I love it. Shared it on stumble, it’s just too good to keep to myself!
Thank you so much, Carolyn – I appreciate it!
Awesome idea!! Time to crank up the ice cream maker! What can be better than homemade ice cream with homemade waffle cones?!
That’s such a cute idea!! Too bad I don’t have a panini press. Don’t throw anything at me k? lol 🙂
Totally doing these this weekend. Why bother trying to fit into my pants anymore???
OMG, you’re a genius. This is such a great idea!!
brilliant, I can almost smell the sugar and cinnamon!
SO COOL! I can’t wait to try this!
This is so brilliant!! You always come up with the most awesome things to do with your panini press but this is my favorite!
Thanks, Kristen! Coming up with new ideas is the most fun aspect of writing this blog. 🙂
I love this idea. So much more fun to eat ice cream in a cone.
My father has one of those panini press, I should give this a try, sounds brilliant… ^_^
This is such a great idea! I’m def going to try it– thanks for the inspirations!
You defintely get all you can out of that panini maker! This is so creative and fun!
Great idea! I’ve got a press and I bet my kids would be thrilled to make these!
What a brilliant idea! I love learning new ways to use kitchen appliances
I tried to make this using a gluten-free flour, as I cannot gluten due to having Celiac Disease. I didn’t have much luck at all. Has anyone else tried to make these gluten-free. They smelled wonderful but didn’t even come together into anything resembling a cone. Thanks in advance.
Oh my gosh, I LOVE this!
Oh no, you’re terribly. You have now given me the final excuse to buy a panini maker. Mine broke and I never replaced it, because honestly, what I used it for could be done with other (smaler or bigger) appliances too. But now I need one again! This really is sheer genius!
How cool is this! you are amazing…I love your creativity!!
What a neat idea! I’ll definitely try these with the grandkids when they come for the summer.
Oh no! Now I’m going to need to buy an ice cream machine and a panini press!!! How clever. Stef has a wonderful blog and I must say, you have done a fabulous job yourself explaining the process and tantalizing my ice cream cone urge. I will find room for two new “tools” if it kills me!!! I’m so saving this post:)
Thanks for sharing, Kathy…
What an incredible idea! Thanks so much for sharing 🙂
I’m so trying this. What a brilliant idea!
Just found the best lower fat ice cream recipe and now this??? It very serendipitous so I am making these this weekend! Thanks!
All signs are pointing to ice cream! 🙂
This is genius! Those cones are so pretty and I bet all panini maker owners will be forever grateful 🙂 Kathy the panini queen!
I’m not really the target market for ice cream comes (lol) but this is still definitely very cool!
Kathy, you are definitely the queen of panini! How inventive – I may have to get a panini press just to make these for my kids!
Oh my goodness, this is amazing! Love it!!
What a great idea! I hate the idea of buying too many things that only serve one purpose like a pizzelle marker would so this is just a genius idea.
Such a great idea!! I can’t wait to try these out!! Thank so much for sharing!
Totally genius. A homemade cone trumps those cardboard flavoured ones you get in a box any day.
very fun post! Hello from Italy by the way…
This is seriously clever. Fabulous photos, too. I’m doing it!
This is brilliant! Another reason to get the panini press out of the cupboard! The cone & ice cream look delicious!
Cool! I just discovered your blog. This is such an awesome idea – I can’t wait to make these cute cones and get some extra use out of my panini press!
I never imagined making my own cones, this is such a great idea. I need a panini press!
OMG! You are a genius! I never use my panini press, but waffle cones? Heck yes! (Glad I found your blog on The Kitchn, now maybe I will use my panini press to make sandwiches again, thanks to your site.)
Thank you so much, Ivy – and thanks for the heads up about The Kitchn!
Epic! Absolutley brilliant!!! I am so glad I discovered your blog today! Thanks Kitchn!!!
I, too use a George for my panini making. I am so excited to try these. I gave my husband an ice cream maker for his birthday and he’s getting Jeni Britton Bauer’s new ice cream book for Father’s day. This will be awesome!!!
And if I can’t get them rolled absolutely tight enough. I’ll just use Martha’s trick of dropping a mini marshmallow in the bottom of the cone before scooping ice cream on top 🙂
You rock!
Thanks so much, Jean! I hadn’t heard of the marshmallow trick – that’s the perfect solution! I definitely want to check out that ice cream cookbook – I get the Jeni’s emails and am always so enticed by her flavors. 🙂
Awesome idea. You’ve given me yet one more reason why I need to add a panini press to my kitchen arsenal! Thanks for a great post.
Couldn’t you just use a funnel to create the ice cream cones? I mean, it’s cone shaped already…..and sturdier than paper. Or is there some problem with the funnel that I’m not aware of ?
I’m sure you could try a funnel. I just don’t happen to have one. It might be a challenge to close the hole at the bottom.
What a fantastic idea, Kathy! I can’t wait to surprise my kids with these cones.
I so love this idea ! For this, I’m gonna have that panini press I always wanted to buy. I’m gonna do it ! Thank you so much for sharing, I can’t wait to try.
What a clever idea! I love using my panini press to make sandwiches, but I never in a million years would have thought of making ice cream cones with it!
Great post! You know, they sell krumkake molds (http://www.fantes.com/images/16634.jpg) that I bet would be great for making cones too.
Um wait, this one is pointier and better for closing the cone on the bottom: http://www.fantes.com/images/16633krumkake.jpg I got it from this website http://www.fantes.com/krumkake.html
Best idea I’ve seen in a blog in ages! I can’t wait to try this out!!
These are unbelievable and exactly what I was looking for! I am making them this weekend for homemade drumsticks. Thank you so much for sharing, Kathy!
Fabulous – I’d love to try homemade drumsticks sometime too!
Hi Kathy! I just posted the recipe for my Homemade Mini Ice Cream Drumsticks, based off of your post. Thanks so much for the inspiration!
http://www.justataste.com/2011/07/homemade-mini-ice-cream-drumsticks/
What a terrific idea! I gotta try this one. 🙂
Can you use milk as a substitute to heavy cream?
Great idea with the panini maker!
Thanks
I haven’t tried it with anything besides heavy cream, but my guess is that using milk, which has less fat, might result in a somewhat less crisp cone and thinner batter. Worth experimenting, though!
I failed miserably at this! I’ve had this page bookmarked for months and finally tried them. Mine came out too thick even though the press was pushed down all the way. They were sort of cakey and broke apart when I tried to shape them. They were still delicious and we ate them like cookies. I don’t know what I did wrong . . . whip the cream too much?
Eek – something definitely was off. Which grill did you use?
Sorry I missed seeing the reply. I have a Cuisinart Griddler.
It’s possible that the Griddler doesnt close as tightly as the Breville panini press I was using. I’ve since bought a Griddler and while I haven’t tried the ice cream cones with it I did try making tortillas and noticed they weren’t quite as thin as I’d like.
Man, I am so confident about my ability to grill a sandwich without one, but this is almost enough to make me need a panini maker! I humbly suggest pairing these with a no-ice-cream-maker salted caramel ice cream: http://emmycooks.com/2012/06/07/salted-caramel-ice-cream-no-ice-cream-maker-required/ 🙂
I also just tried this recipe with my breville panini press and ended up with a puffy crumbly mess.
Don’t waster your time with this unless you have a pizzelle press.
Britt
Hi Britt – Which Breville press do you have? Did you close the lid all the way to flatten the dough? I’ve made this recipe many times on my Breville, including twice last week, and it has consistently worked but you do need to press the dough all the way flat.
can i use a grill toaster?
I’m not sure what a grill toaster is?
I am currently making these. Thank you. I found that once I put the batter on the panini press if I spread it around very quickly with an offset spatula I could control the shape better. I also cut the recipe to only use 1 cup of cream. I added a tablespoon of almond flour, leaving out one tablespoon of regular flour.
Great suggestions, Scott!
Oh, I forgot. To plug up the holes I melted some chocolate chips and dribbled it down in. And the 1/3 recipe makes 8-10 small cones.
A great idea to make ice cream cones at home. My kids will love these!
Gosh, that sounds so cool.
one question though- the original recipe uses 3 cups cream for 1.5 cups flour/sugar etc. but you use 1 cup heavy cream for the same 1.5 cups flour/sugar etc. Is this a mistake [and so I 1/3 the entire recipe] or not [and so I should 1/3 just the cream]?
Thanks!
Hi Bunny – The food network version of the recipe changed at one point and I’m not sure why. People discussed the change in the comments on that site a bit. Anyway, I’ve always used a cup of flour to 1-1/2 cups cream (including all afternoon last weekend during a demo at Whole Foods!) so I can confirm that 1 cup of flour works. 3 cups of cream would be much runnier – too runny for the panini press for sure.
Could you use a pizzelle maker for these?
Worth a try?
your recipe calls for one cup heavy cream recipe that you told me to go to says 3 cups heavy cream which is it that’s a big difference
Hi Gary – you’ll see in the comments on that food network recipe there was actually a bit of discussion about the 1 cups vs 3 cups. I’ve always used 1 cup – it creates a thicker, dough-like batter that is better for making cones on the panini press, as it doesn’t spread off of the plates.
they look great!
but i was wondering because i am vegan at home that do you think it would work if i used coconut cream instead of normal thick cream?
I’m afraid I’m not too familiar with making vegan substitutions, but the coconut cream might be worth a try. P.S. Sorry for the much delayed response to your question, it got buried under a bit of spam, yikes! ~Kathy
Hi! Great idea, thanks Do you know if these cones stay crispy for a while? Ie, if I make it one day, will it survive for 24-48 hours until party day?
Thanks!
Hi Angela — They’re really best the same day (even better if real-time!). I might save them for 24 hours in an airtight container, but not 48 hours. ~Kathy
Bet you could make cannoli shells in a similar way by adding cocoa powder to the recipe and make tube shaped instead of a cone.