It worked!
It’s not only possible to make an apple turnover on a panini press, it’s actually quick and easy and in some ways comes out better than if you’d baked it in the oven. Putting the puff pastry directly on the grates ensures crispiness on the outside as well as creates ridges that cradle the caramel sauce. I made two attempts – one where I carmelized the apples and one where I didn’t.
Apple Turnover Panini – Attempt #1
- Bread: Puff Pastry
- Condiment: Caramel, essentially – sugar, cinnamon, nutmeg & butter
- Cheese: None
- Meat: None
- “Goodies”: Fuji apples
THE INSPIRATION: Apple turnovers!
THE PREPARATION: I thawed one sheet of the puff pastry (I used Pepperidge Farm) for 40 minutes at room temperature and then kept it cold in the refrigerator until I needed it. Then I got to work on the apples. I knew it was important to keep the apples from browning once I’d sliced them and I’d normally use lemon to achieve this…of course, I’d forgotten to buy any lemons! So I went with orange juice instead, which I later discovered was probably a better move anyway. I poured 1-1/2 cups of OJ into a medium bowl, ready to receive apple slices. I love Fuji apples so I peeled, cored and sliced (1/8″ thick) two of them and deposited them into the OJ bowl as I went. Seemed like just about the right amount of juice to apples – enough to cover, not a lot of excess.
Then, in a gallon-sized ziploc plastic bag I combined 2 tablespoons of granulated sugar, 1/4 tsp of cinnamon and a pinch of nutmeg. I drained the apples (without rinsing), poured them into the bag, sealed the bag and shook to coat.

In a saute pan, I melted 1 tablespoon of butter over medium-high heat. I added half of the apple mixture (retained the other half for the “raw test”), sauteed the apples for about 6 minutes until them they were caramelized and set them aside.
Time to heat up the panini press – I set it to 400 degrees.
THE CONSTRUCTION: I rolled the sheet of puff pastry out to a 12″ x 12″ square on a floured surface (a thin cutting board). I then divided the pastry into 4-6″ x 6″ squares. I spooned some of the carmelized apple slices into the center of two of the squares – I kind of eyeballed it to make sure there was a good amount of apples in each, but not overfilled. I also tried to lay the apples out evenly to create a somewhat flat surface, rather than piling them. I thought this might be important when it came time to press. I dipped my finger in water, wet the edges of the pastry and folded it over to form a triangle. I folded the edges over and pressed to seal.

Finally, the moment of truth. I placed the pastry on the lower grate of the press and lowered it to the 2nd-from-the-bottom height (the Breville Ikon press allows you to adjust the height; other models may as well). Juices started bubbling out after about 2 minutes – I grabbed the drip tray attachment immediately. The press may be non-stick, but my countertops are not! While initially only the tallest areas of the turnover panino were touching the upper grate, by 7 minutes the rest of the pastry had puffed to touch as well. I grilled the turnover for a total of 10 minutes.

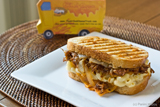
THE RESULTS: Excellent! I was so pleased to see that puff pastry can be grilled on a panini press! But how would it taste? I decided to plate the apple turnover panini with a scoop of vanilla ice cream and a drizzle of chocolate sauce. My husband suggested a slice of strawberry would be a nice garnish as well (unfortunately we didn’t have any).
The apples had good bite – not too soft or too hard. Also, the cooked-on caramel easily wiped off of the press grates (I’d been fearing the clean-up!).
I did feel the recipe could be improved, though: I didn’t love the chocolate sauce. Perhaps it would have been better if I’d actually made a fudge sauce rather than resorting to the Hershey’s. I felt caramel would probably be a better accompaniment to the apples and cinnamon.
Which lead me to…
Apple Turnover Panini – Attempt #2
Same ingredients and preparation as in Attempt #1, except this time I decided to bypass the apple carmelization step. I also let the turnover stay on the press for 2 minutes longer for the pastry to get more golden and flakier.

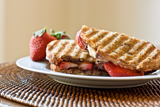
THE RESULTS: Even better! Without the carmelization of the apples, I could actually taste the orange juice on the apples, which was nice added flavor. Also, the caramel sauce complemented the apples and cinnamon flavors much better than the chocolate sauce did. We have a winner!
 Panini Happy, online since 2008, is more than just a sandwich blog. Here, you'll find hundreds of my original