 Now that I’ve got a lot of sandwich-grilling experience under my belt, I thought I’d pause for a moment and share what I’ve learned about how to make great panini. What would a Panini 101 series be without a good, old-fashioned “how-to” guide? So here it is: your step-by-step guide to successfully making any type of panini you can dream up.
Step 1 – Invest in a good panini press
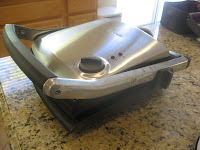 Yup, I said it. If you think you’re likely to make panini more than just a few times, I’d highly recommend buying a grill. I’ve tried several different panini-making methods and the panini press was, by far, the easiest and produced the best results. A lot of people will tell you can make good panini with two skillets – if that works for them, that’s great. But if you ask me (and you are, if you’re reading this!), I say get the press. What features should you look for? Get one that allows you to regulate the temperature and the amount of pressure on the sandwich. Some models come with removable grates, which is really helpful when it comes time to clean up. I personally use the Breville Ikon Panini Press, sold at Williams-Sonoma.
Step 2 – Pick your bread and fillings
 One of the best attributes of panini is that they’re infinitely versatile and customizable. There’s a good chance you have all the ingredients you need right in your fridge and pantry right now. A few things to keep in mind:
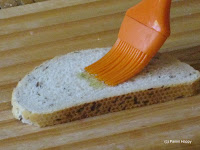
- Denser is usually better, when it comes to choosing bread. You want something that can stand up to and will be enhanced by the grilling process. My favorites are ciabatta and sourdough – french and rye work really well too. Slices about 1/2″ thick are best – any thicker and your sandwich is likely to be “bready”; thinner slices may flatten out too much in grilling. Want to give your bread a nice, crisp crunch? Brush a little olive oil or melted butter on the outsides before grilling.
- Experiment with your favorite flavors. Re-create your favorite classic sandwiches or invent entirely new combinations. In the U.S., panini generally include cheese – it’s a great opportunity to explore the specialty cheese section of your grocery store to discover new flavors. Got leftovers? Turn them into panini! Last night’s roasted chicken tastes even better today with some swiss cheese bacon and tomatoes on sliced sourdough.
- Less is more. Remember – you want everything to stay inside your panini so be sure not to overfill the sandwich!
Step 3 – Heat the grill
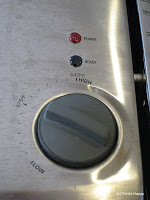 How high should I heat the grill? That depends on what you need the heat to do for your sandwich. With thinner panini like simple grilled cheese, where all you need to do is melt the cheese and grill the bread, a medium-high temperature (about 375 degrees) works great – 3 minutes and it’s perfect. If you’ve got a more substantial sandwich, with meat that needs to be heated through, I’d recommend using a low heat setting (about 200 degrees) and grill for about 10 minutes. In either case, it’s a good idea to lift the lid and check periodically. And if you start to hear the sizzle of cheese on the grates, that’s a sure sign it’s melted!!
Step 4 – Grill your panini
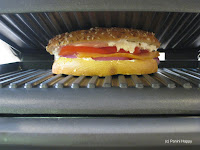 A major advantage a panini press has over other types of grills or the two-pan method is that you can regulate the amount of pressure on the sandwich. If you’ve ever over-pressed a sandwich such that all the fillings squeezed out, leaving you with bread-on-bread you know the mess I’m talking about! Just as carefully as you place your panini onto the grill, also take care to lower the lid slowly until it makes full, secure contact with the panini. As the cheese melts, the panini will flatten further. Again, keep an eye on things and you shouldn’t have any surprises.
Step 5 – Eat now!
 Here’s a step that shouldn’t be hard to follow! Panini taste best right off the grill, while the bread is still nice and crispy and the fillings are hot. Got a crowd coming over? Prepare the panini ahead of time and grill them right before you’re ready to serve. If you must reheat panini, a toaster oven is best – about 8-10 minutes at 275 degrees. DO NOT MICROWAVE PANINI (unless you have a tool like the Micro Grill), as it will make the bread chewy and soggy and that’s just not appetizing.
These are the steps I take to my panini and I’ve been pleased with the results. I hope they’re helpful to you as well – and, by all means, please share any other tips that have worked well for you!
 Panini Happy, online since 2008, is more than just a sandwich blog. Here, you'll find hundreds of my original




What a great guide! I really need a panini maker.
That panini press looks like a great little tool! I’ve been wanting to try my hand at panini and a tool like that just might get me to finally do it!
what a great way to eat sandwiches…you can use this grilling machine to stuff any bread with anything under the sun…well, almost!
thanks for your recipes…your photos are beautiful!
Do the stove top panini griddles that come with the hand held press work alright? They sell them at Target and I was thinking about getting one.
Kitty – I haven’t tried the cast iron panini presses before but they’re pretty tried and true so I’m sure they work fine.
I’ve got a stove top Panini press. It works fine but, I think I’d like an electric press better because I could grill veggies and the water would run off instead of sitting in the pan. The table top version also feels kinda clumsy. For sure it is heavy.
david
I love this panni maker I recently purchased it, my husband and I make dinner in five mins now.
We even grill our veggies on it…I love not having to wait 10 mins for the gas grill to heat up.
Hi Kathy,
Thank you for this article.
I own the same Breville sandwich press and I was thinking of getting a toaster silicone mat to use with it.
Do you, by chance, know what is the maximum temperature this Breville press reaches?
Most silicone mats are ok to use in environments upto 230 degrees celsius, so I was wondering if the Breville heats at higher temperatures (or not), so that I don’t accidentally burn the silicone mat.
I would really appreciate your answer.
Best regards.
Hi Miki — I’m afraid I don’t have the specifications, but you might reach out to Breville’s customer service, they should know. ~Kathy